
Kalanchoe, with its vibrant blooms and succulent foliage, is a popular choice among plant enthusiasts. Whether you’re a seasoned gardener or just starting your green journey, learning how to propagate Kalanchoe can be both rewarding and enjoyable.
**Understanding Kalanchoe Propagation**
When it comes to propagating Kalanchoe, there are two primary methods: using cuttings or propagating from a leaf. Both techniques have their advantages, and understanding the process can help you successfully expand your Kalanchoe collection.
**1. Propagating from Cuttings**
Trimming an overgrown Kalanchoe plant not only helps maintain its size but also provides opportunities for propagation. After trimming, allow the cuttings to callus for a day or two to reduce the risk of rotting. Then, place the cuttings in a container with water, ensuring that at least one node (where leaves attach to the stem) is submerged.
Root development typically begins within a few weeks. Once roots are well-established, transplant the cuttings into well-draining soil. You can pot them individually or group them together for a fuller display.
One benefit of propagating from cuttings is faster blooming. Since the cuttings already have a mature stem, they are more likely to produce flowers sooner compared to leaf propagation.
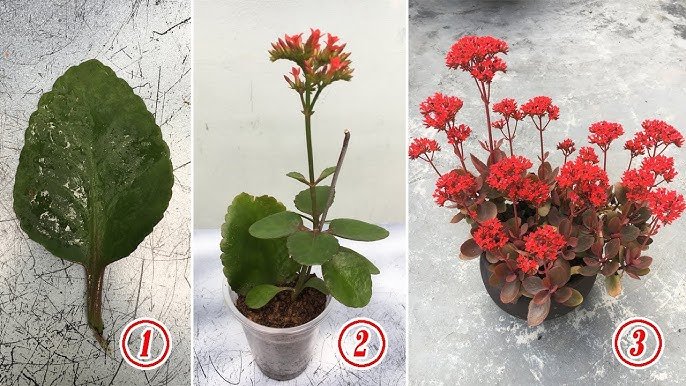
**2. Propagating from Leaves**
Propagating Kalanchoe from a leaf is another viable method, especially if you prefer a more hands-off approach. Select a healthy leaf from the parent plant, ensuring it is plump and free from damage. Gently twist the leaf from the stem, making sure to keep its base intact.
Place the leaf on a well-draining potting mix, covering the base slightly with soil while keeping the majority of the leaf exposed. Mist the soil lightly and maintain a slightly humid environment by covering the pot with a clear plastic dome or using a plastic bag.
Roots will emerge from the base of the leaf over time, eventually giving rise to a new plantlet. Patience is key with this method, as it may take longer for the plantlet to establish itself compared to cuttings.
**Tips for Success**
– **Light and Water:** Provide bright, indirect light for newly propagated Kalanchoe plants. Water sparingly, allowing the soil to dry out between waterings to prevent root rot.
– **Temperature and Humidity:** Maintain a warm environment with moderate humidity levels. Avoid placing newly propagated plants in drafty or overly dry locations.
– **Potting Mix:** Use a well-draining potting mix tailored for succulents or cacti to promote healthy root growth.
**Sharing the Joy of Kalanchoe**
Propagation not only helps expand your Kalanchoe collection but also provides an opportunity to share these beautiful plants with friends and family. Whether you opt for cuttings or leaf propagation.
In conclusion, mastering Kalanchoe propagation techniques opens up a world of possibilities for creating thriving and abundant displays of these stunning plants. With patience, care, and a bit of green-thumb magic, you can enjoy the beauty of Kalanchoe in your home or garden year-round.