
Orchids stand as timeless symbols of beauty, captivating enthusiasts with their diverse array of varieties. Imagine the delight of having your home adorned with flourishing orchids, each bloom a testament to nature’s elegance. Yet, nurturing these botanical marvels demands dedication and skill. Fortunately, the art of propagating orchids offers enthusiasts the opportunity to cultivate new plants from old, breathing life into wilted branches and revitalizing their collections.
**Understanding Orchid Propagation: A Journey with Dendrobium and Thunia**
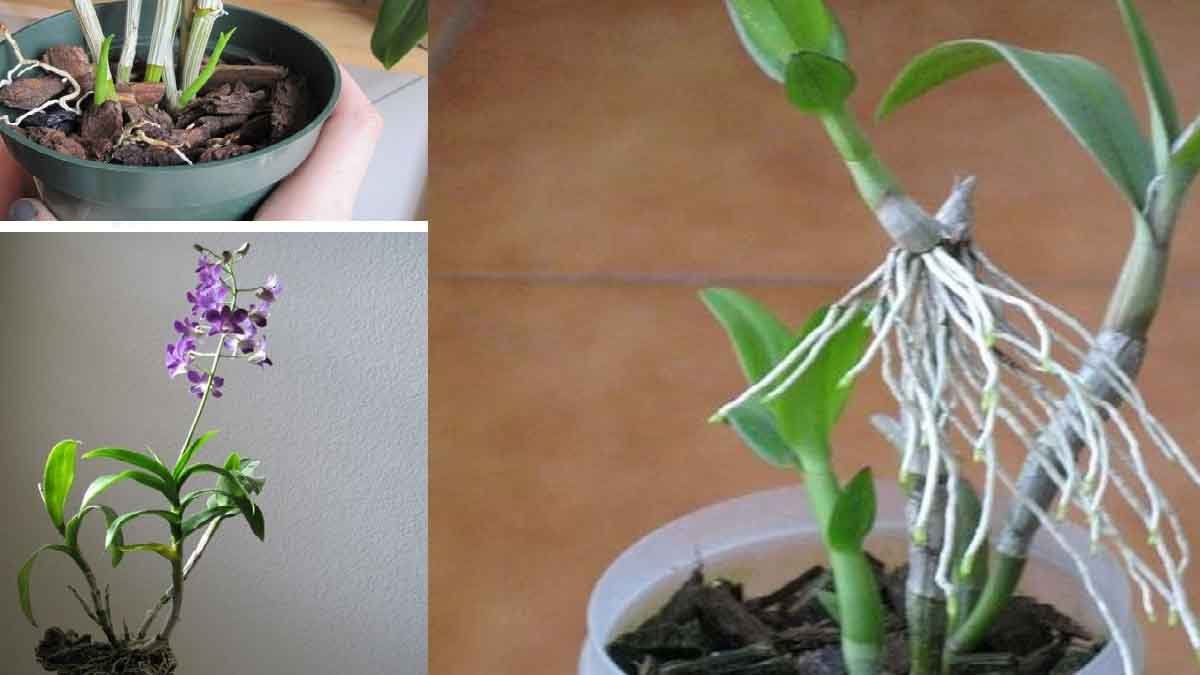
The journey of orchid propagation begins with understanding the unique needs of each species. Dendrobium and Thunia, renowned for their ornate blooms and resilience, offer ideal candidates for propagation.
To embark on this botanical adventure, one must first gather the necessary tools: pruning shears, a plastic cup, and a dash of bleach. While this might sound like an unusual combination, each item plays a crucial role in ensuring the success of the propagation process.
**Step 1: Preparation and Pruning**
Before delving into the propagation process, it’s essential to prepare the pruning shears. Submerge the blades in a solution of bleach, effectively sterilizing them to prevent the introduction of harmful bacteria. This meticulous step safeguards the health of both parent and offspring plants, minimizing the risk of infection.
With sterilized shears in hand, carefully select several wilted branches from the parent plant. Exercise caution during this process, ensuring clean cuts to promote successful propagation.
**Step 2: Nurturing New Beginnings**
Once the branches are selected, it’s time to prepare the propagation medium. A blend of sphagnum moss provides an ideal environment for root development, offering both moisture retention and aeration.
Lay the pruned branches horizontally atop the sphagnum moss, refraining from exerting pressure that could impede growth. Encase the setup in transparent film, creating a mini-greenhouse that fosters optimal conditions for germination.
**Step 3: Patience and Persistence**
With the stage set, it’s a waiting game as nature works its magic. Patience becomes the gardener’s greatest ally as they eagerly await the emergence of new growth. Regularly aerate the setup to maintain freshness, providing ample airflow to support healthy development.
As the branches begin to sprout from their nodes, a sense of accomplishment fills the air. These tender shoots signify the promise of new life, each one a testament to the gardener’s nurturing care.
**Step 4: Transplanting and Tending**
Once the branches have established roots, it’s time to transplant them into individual pots filled with orchid-specific soil. Gentle handling is paramount during this transition, ensuring minimal disruption to the delicate root system.
From here, the journey of orchid propagation continues, with diligent care and attention guiding the young plants towards maturity. With time and nurturing, these fledgling orchids will bloom once more, a testament to the artistry and resilience of nature.
**Conclusion: Cultivating Orchid Legacy**
In mastering the art of orchid propagation, enthusiasts unlock a world of possibilities, breathing new life into wilted branches and nurturing the legacy of these botanical treasures. Through patience, persistence, and a touch of horticultural finesse, the journey of orchid propagation unfolds, offering a glimpse into the intricate beauty of nature’s design. So, roll up your sleeves, gather your tools, and embark on this botanical adventure—it’s time to propagate orchids and cultivate beauty that blooms anew.