
Are you intrigued by the idea of cultivating your own lemon trees from cuttings, bypassing the complexities of traditional gardening methods? Look no further! In this comprehensive guide, we’ll walk you through a unique and straightforward technique that requires nothing more than a 2-liter plastic bottle and a few essential materials. Say goodbye to hassle and welcome an effective method of propagating lemon trees.
**Materials Needed:**
Before delving into the step-by-step process, let’s gather the essential materials you’ll need:
1. **2-liter Plastic Bottle**: This will serve as the key component of our innovative propagation method.
2. **Sandy or Well-Draining Soil**: To provide the perfect environment for the root development of your lemon tree cuttings.
3. **Lemon Tree Cuttings (6-8 inches long)**: Select healthy cuttings with nodes to ensure a higher success rate.
4. **Rooting Hormones (optional)**: Use these to promote quicker root development, although they’re not mandatory.
5. **Sharp Knife or Scissors**: For preparing the cuttings.
6. **Rubber Bands or Twine**: To secure the plastic bottle and create a mini greenhouse.
7. **Watering Bottle or Sprayer**: To maintain proper moisture levels.
**Now that we have our materials ready, let’s proceed with the steps:**
**Step 1: Prepare the Cuttings**
Begin by selecting healthy lemon tree cuttings. These cuttings should be approximately 6-8 inches long and have nodes. Optionally, use rooting hormones to encourage root development.
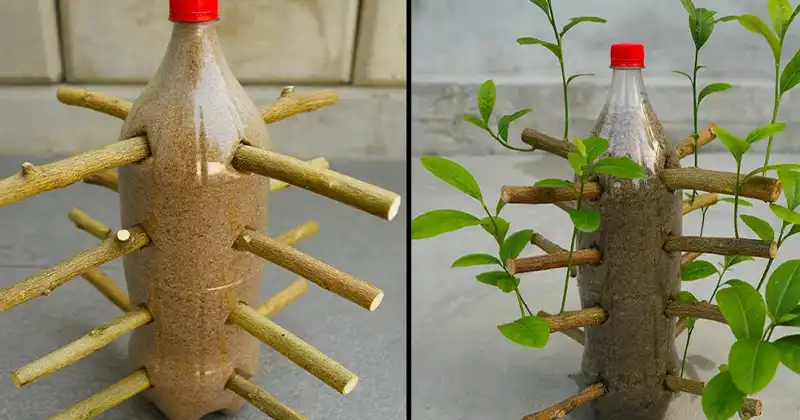
**Step 2: Create Cross-Shaped Openings**
Take the 2-liter plastic bottle and create cross-shaped openings (+) on each side. These openings should be large enough to accommodate the lemon tree cuttings without them falling out.
**Step 3: Insert the Cuttings**
Gently insert the lemon tree cuttings into the cross-shaped openings you created. Ensure they are securely positioned within the bottle.
**Step 4: Seal and Maintain**
Cover the bottle’s lid with transparent film or a plastic bag and secure it with rubber bands or twine. This cover will create a greenhouse effect, helping to maintain moisture around the cuttings. Place the bottle in a well-lit area with indirect sunlight.
**Step 5: Maintain Moisture**
It’s essential to keep the cuttings and the inside of the bottle consistently moist. Use a watering bottle or sprayer to regularly mist the cuttings. This helps create the ideal conditions for root development.
**Step 6: Monitor Growth**
Over time, check the cuttings for root development. You can gently tug to check resistance, indicating root formation.
**Step 7: Transplant**
Once the cuttings have rooted and sufficiently developed, you can transplant them into individual pots or directly into the garden, where they will grow into robust lemon trees.
By following this unique technique, you’ll enjoy the satisfaction of growing lemon trees from cuttings with minimal hassle. Patience is key, as it may take several weeks to see significant progress, but the results will undoubtedly be worth the effort.