Potatoes are versatile, delicious, and surprisingly easy to grow, even if you have limited space such as a balcony or patio. Growing potatoes in pots not only saves garden space but also allows you to enjoy fresh, homegrown tubers with minimal effort. With just one potato, you can kickstart your potato-growing journey and harvest a satisfying crop. Follow these easy steps to grow potatoes in pots at home:
1. Choose the Right Potato Variety
Selecting the right potato variety is key to successful container gardening. While you can use store-bought potatoes, it’s best to choose certified seed potatoes from a garden center or reputable supplier. Popular potato varieties for container growing include Yukon Gold, Red Pontiac, and Fingerling potatoes.
2. Gather Your Materials
- Potatoes: Use one or two seed potatoes per medium-sized pot (about 10-12 inches in diameter).
- Large Pots: Choose deep pots or containers with drainage holes to accommodate potato growth. Each seed potato requires about 2 gallons of soil.
- Quality Potting Soil: Use well-draining, nutrient-rich potting soil suitable for vegetable gardening.
- Fertilizer: Consider using a balanced fertilizer or organic compost to enrich the soil.
- Watering can or hose: Ensure you have a convenient way to water your potato plants regularly.
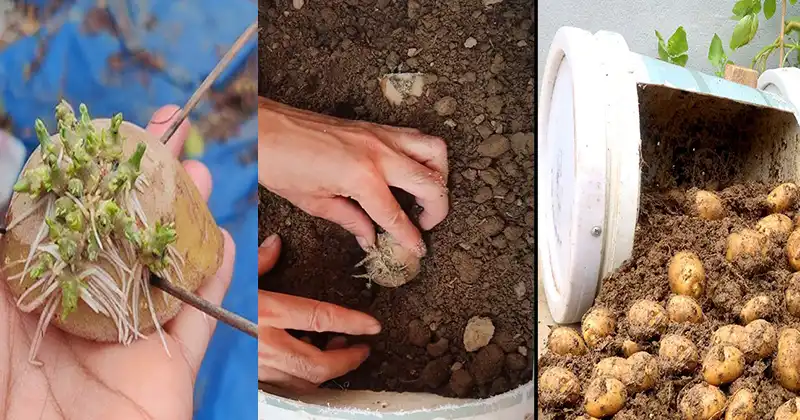
3. Prepare the Seed Potatoes
Before planting, prepare the seed potatoes to encourage sprouting:
- Cutting (optional): If your seed potatoes are large, you can cut them into pieces with at least two eyes (or sprouts) each. Allow cut pieces to air dry for a day to form a protective layer before planting.
- Whole Potatoes: If using small or medium-sized seed potatoes, you can plant them whole without cutting.
4. Planting Process
Follow these steps to plant your seed potatoes in pots:
- Fill the Pot: Fill the bottom of the pot with 4-6 inches of potting soil.
- Plant Potatoes: Place the seed potatoes or potato pieces (cut side down) on top of the soil layer.
- Cover with Soil: Cover the potatoes with 3-4 inches of soil, leaving about 1-2 inches of space from the rim of the pot.
- Water Thoroughly: Water the soil until it’s evenly moist but not waterlogged.
5. Provide Proper Care
- Sunlight: Place the potato pots in a sunny location that receives at least 6-8 hours of sunlight daily. Rotate the pots occasionally for even sunlight exposure.
- Watering: Keep the soil consistently moist throughout the growing season. Water when the top inch of soil feels dry to the touch.
- Fertilization: Apply a balanced fertilizer or compost every 4-6 weeks to provide essential nutrients.
- Hilling (optional): As potato plants grow and sprout above the soil, add more soil or mulch around the stems to cover them partially. This process, called hilling, encourages more tuber formation.
6. Monitor Growth and Harvest
- Growing Period: Potatoes typically take 70-120 days to mature, depending on the variety. Monitor plant growth and flowering as indicators of maturity.
- Harvesting: Once potato plants flower and start to yellow and wither, it’s time to harvest. Carefully dig around the plant to unearth the potatoes, being gentle to avoid damaging tubers.
7. Enjoy Your Homegrown Potatoes
After harvesting, allow the potatoes to cure in a cool, dry place for a week to toughen their skins and improve storage. Store cured potatoes in a dark, cool (but not cold) location for long-term storage or enjoy them fresh in your favorite potato recipes!
Conclusion
Growing potatoes in pots at home with just one potato is a rewarding and straightforward gardening project for beginners and experienced gardeners alike. By following these steps and providing proper care, you can harvest a satisfying crop of delicious potatoes right from your own garden or patio. Embrace the joy of homegrown produce and savor the flavors of freshly harvested potatoes in your meals!